Dell monitoring:SC series Compellent, PowerVault MD3000, EqualLogic
In case of usage of Virtual Appliance
- Use local account lpar2rrd for hosting of STOR2RRD on the virtual appliance
- Use /home/stor2rrd/stor2rrd as the product home
- Dell Storage Enterprise Manager
- Dell Storage Manager Data Collector
User rights options
- Create user stor2rrd under admin role or use already existing admin account. Admin rights give you visibility of the whole storage include items not being under any folder and system subsystems like:
- Node (controller): CPU, IO, data, response time
- Port: IO, data, response time
- Create user stor2rrd under Reporter role and assign him rights to all or specific:
- volume folders
- server folders
- disk folders
You can whenever switch from Reporter access to admin one and vice versa.
Note: the latest DSM and Data Collector versions enabled getting all data via Reporter role.
In both cases you have to create a user on all storage and on Enterprise Manager/Data collector where you have to attach those storage under that Reporter or admin account.
Storage connectivity
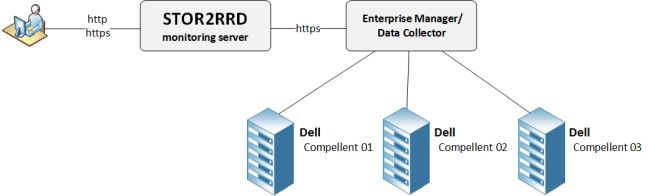
- Install the Enterprise Manager or DSM Data Collector and attach there your Compellent boxes.
-
Create user stor2rrd on the Enterprise Manager or DSM Data Collector under admin role.
Unfortunatelly admin role is only the role which can get all performance data from the storage.
-
If you use web tool Unisphere central for SC series then registration there is not enough.
You have to register storage for user in Enterprise Manager or DSM Data Collector.
-
Allow access from the STOR2RRD host to the Enterprise Manager on port 3033 (HTTPS).
$ perl /home/stor2rrd/stor2rrd/bin/conntest.pl 192.168.1.1 3033
  Connection to "192.168.1.1" on port "3033" is ok
-
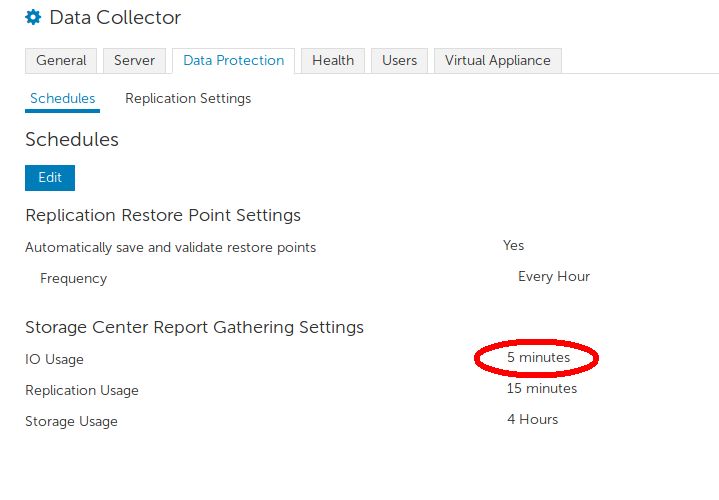
Set "Report gathering settings" of IO usage to 5 minutes.
STOR2RRD storage configuration
- All actions below under stor2rrd user (lpar2rrd on Virtual Appliance)
-
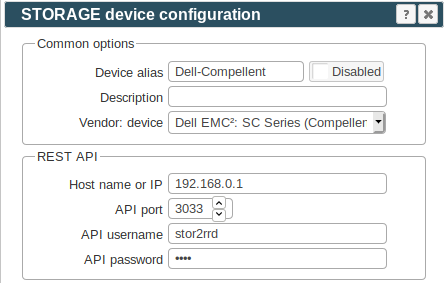
Add storage into configuration from the UI:
Settings icon ➡ Storage ➡ New ➡ Vendor:device ➡ Dell SC series
-
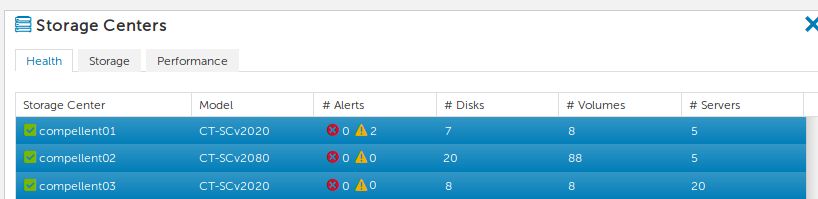
On the picture you can see 3 compellent storage in the Enterprise Manager.
Configure every storage you want to monitor, use same storage name alias as you see in the Enterprise Manager.
-
Make sure you have enough of disk space on the filesystem where is STOR2RRD installed
Roughly you might count 2 - 30 GB per a storage (it depends on number of volumes, 30GB for 5000 volumes)$ df -g /home # AIX $ df -h /home # Linux
-
Test storage connectivity, either from the UI or from the command line:
If you get an errors like "Missing LWP::Protocol::https", "Connection reset by peer" or "500 SSL negotiation failed" then follow this.
$ cd /home/stor2rrd/stor2rrd
$ ./bin/config_check.sh
  =====================
  STORAGE: compellent01 : COMPELLENT
  =====================
  connection ok
- Schedule to run storage agent from stor2rrd crontab (lpar2rrd on Virtual Appliance, it might already exist there)
Add if it does not exist as above
$ crontab -l | grep load_compellentperf.sh
$
Assure there is already an entry with the UI creation running once an hour in crontab$ crontab -e # Dell SC Series (Compellent) 0,5,10,15,20,25,30,35,40,45,50,55 * * * * /home/stor2rrd/stor2rrd/load_compellentperf.sh > /home/stor2rrd/stor2rrd/load_compellentperf.out 2>&1
$ crontab -e

# STOR2RRD UI (just ONE entry of load.sh must be there)
5 * * * * /home/stor2rrd/stor2rrd/load.sh > /home/stor2rrd/stor2rrd/load.out 2>&1
-
Let run the storage agent for 15 - 20 minutes to get data, then:
$ cd /home/stor2rrd/stor2rrd
$ ./load.sh
- Go to the web UI: http://<your web server>/stor2rrd/
Use Ctrl-F5 to refresh the web browser cache.
In case of usage of Virtual Appliance
- Use local account lpar2rrd for hosting of STOR2RRD on the virtual appliance
- Use /home/stor2rrd/stor2rrd as the product home
SMcli installation
-
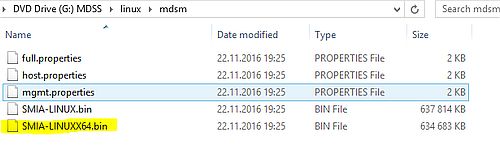
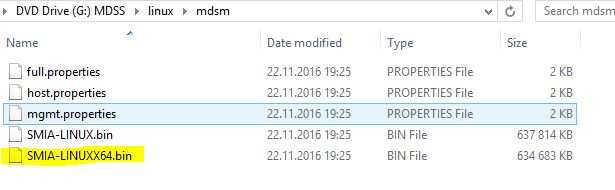
You can find SMcli install package inside Resourse DVD
Download DELL_MDSS_Consolidated_RDVD_6_5_0_1.iso
-
You can download SMcli package even from the IBM site (you need to know storage serial and have IBM ID free account)
Go to IBM fix central and follow this:
Product Group [System Storage] ➡
Select from System Storage [Disk systems] ➡
Select from Entry level disk systems [DS3000] ➡
Release [All] ➡
Platform [AIX/Linux ...]
Download only *SMIA* package like:
SM10.86_Linux_64bit_x86-64_SMIA-10.86.x5.43.tgz
SM10.86_AIX_SMIA-10.86.x5.43.tgz
Note actual IBM page does not seem to contain SMIA package, use Storage manager which should contain SMCli: Disk-SM-AIX-Dec-2013-version-10.86.x5.43
-
AIX prerequisites:
Install X11 packages from your AIX install media:- X11.adt
- X11.base
- X11.motif
# lslpp -L |egrep "X11.adt|X11.base|X11.motif"
  X11.adt.bitmaps            6.1.0.0    C     F    AIXwindows Application
  X11.adt.ext                6.1.6.0    C     F    AIXwindows Application
  X11.adt.imake              6.1.6.0    C     F    AIXwindows Application
  X11.adt.include            6.1.4.0    C     F    AIXwindows Application
  X11.adt.lib                6.1.2.0    C     F    AIXwindows Application
  X11.adt.motif              6.1.6.0    C     F    AIXwindows Application
  X11.base.common            6.1.0.0    C     F    AIXwindows Runtime Common
  X11.base.lib               6.1.6.0    C     F    AIXwindows Runtime Libraries
  X11.base.rte               6.1.6.0    C     F    AIXwindows Runtime Environment
  X11.base.smt               6.1.6.0    C     F    AIXwindows Runtime Shared
  X11.base.xpconfig          6.1.0.0    C     F    Xprint Configuration Files
  X11.motif.lib              6.1.6.0    C     F    AIXwindows Motif Libraries
  X11.motif.mwm              6.1.6.0    C     F    AIXwindows Motif Window
-
Install SMcli under root user
Check install log below for errors if you do not see "Congratulations ..." message after the installation.# umask 022 # gunzip SM10.86_AIX_SMIA-10.86.x5.43.tgz # tar xvf SM10.86_AIX_SMIA-10.86.x5.43.tar # cd AIX10p86/AIX # sh SMIA-AIX-10.86.0605.0043.bin -i console (accept the license agreement, type "enter" many times ) Please choose the Install Set to be installed by this installer. 1- Typical (Full Installation) --> 2- Management Station 3- Host 4- Customize... ENTER THE NUMBER FOR THE INSTALL SET, OR PRESS <ENTER> TO ACCEPT THE DEFAULT : 2 ...... Congratulations. IBM System Storage DS Storage Manager 10 has been successfully installed to: /opt/dell/mdstoragemanager # lslpp -L|grep SMclient SMclient.aix.rte 10.86.6543.0 C F IBM DS Storage Manager Client # ls -l /usr/SMclient/SMcli -r-x------ 1 root system 1008 Oct 10 2013 /usr/SMclient/SMcli
/opt/dell/mdstoragemanager/*System_Storage_DS_Storage_Manager_10_InstallLog.log
-
Note: you might hit into the IBM installer bug during rpm install of SMclient-10.86.0G05.0043-1.noarch. Below is the workaround.
Then try installation again.
# ln -s /opt/dell/mdstoragemanager/ia/jre/ /opt/dell/mdstoragemanager/jre
-
When you have Debian based Linux (Ubuntu etc) which does not support rpm packaging then you will find uninstalled packages in /opt/dell/mdstoragemanager
Convert them in debian packages and install them as root:# cd /opt/dell/mdstoragemanager # alien SMclient.rpm # alien SMesm.rpm # alien SMruntime.rpm # dpkg -i smclient_10.86.0G05.0043-2_all.deb # dpkg -i smesm_10.86.0G05.0007-2_all.deb # dpkg -i smruntime_10.86.0A05.0001-2_amd64.deb # ls -l /usr/SMclient/SMcli -r-x------ 1 root system 1008 Oct 10 2013 /usr/SMclient/SMcli
-
Stop SMmonitor service
AIX:Linux:# SMmonitor stop # rmitab smmonitor
Linux systemd:# /opt/SMgr/client/SMmonitor stop # chkconfig --list SMmonitor # chkconfig --level 2345 SMmonitor off alternatively: # rm -f /etc/rc2.d/S99SMmonitor /etc/rc.d/init.d/SMmonitor
# systemctl stop smmonitor.service
# systemctl disable smmonitor.service
- Allow user stor2rrd run SMcli API (lpar2rrd user on Virtual Appliance)
Under root execute following:If you do not do it then you get such error by running it under someone else than root:# rm -f /var/opt/SM/emwdata_v04_bin.lock /var/opt/SM/pref_01_bin.lock # chown stor2rrd /opt/dell/mdstoragemanager/client/SMcli /var/opt/SM/prefbackup_01.bin # chown stor2rrd /var/opt/SM/emwback_v04.bin /var/opt/SM /var/opt/SM/emwdata_v04.bin # chown stor2rrd /var/opt/SM /var/opt/SM/pref_01.bin # chmod -f 644 /usr/SMruntime/jre/lib/security/java.security # chmod -f 755 /opt/dell/mdstoragemanager/client/lib/*
(Do not forget to deactivate SMmonitor as above as it can change file rights back to root itself)# su - stor2rrd $ SMcli -d An internal error, error code 12, has occurred. This is possibly due to initialization problems when loading the necessary internal files. Please check your installation of the storage management client. If problems continue to persist, re-install the storage management client.
Storage configuration
- All actions below under stor2rrd user (lpar2rrd on Virtual Appliance)
# su - stor2rrd
- Allow access from the STOR2RRD host to the storage on both controllers on port 2463.
Test if port is open:$ perl /home/stor2rrd/stor2rrd/bin/conntest.pl 192.168.1.1 2463 Connection to "192.168.1.1" on port "2463" is ok
- Connect new storage, you must connect both storage controllers
Use "MD3800_01" further for etc/storage-list.cfg configuration$ SMcli -d There are currently no storage subsystems listed in the configuration file. Add storage subsystems using the Add Storage Subsystem option in the storage management software or by command line. $ SMcli -A 192.168.1.1 192.168.1.2 New storage subsystem was discovered at address 192.168.1.1 New storage subsystem was discovered at address 192.168.1.2 SMcli completed successfully $ SMcli -d MD3800_01 ControlerA_hostname ControlerB_hostname
- Check if the storage needs user authorization (new firmwares allows to specify password for monitor user role):
When it fails then use "monitor" role credetials (password can be set in the storage UI):$ SMcli -n MD3800_01 -e -c "show hostTopology;"
Use that credentials in future etc/storage-list.cfg configuration$ SMcli -n MD3800_01 -e -c "show hostTopology;" The operation needs either the 'Administrator' or 'Monitor' password to be set. $ SMcli -n MD3800_01 -p <password> -R monitor -e -c "show hostTopology;"
STOR2RRD storage configuration
- All actions below under stor2rrd user (lpar2rrd on Virtual Appliance)
- Make sure that this is set in /home/stor2rrd/stor2rrd/etc/stor2rrd.cfg : DS5_CLIDIR=/opt/dell/mdstoragemanager/client
-
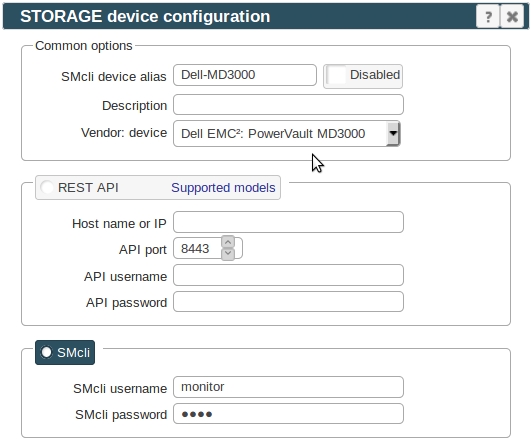
Add storage into configuration from the UI:
Settings icon ➡ Storage ➡ New ➡ Vendor:device ➡ Dell MD3000
-
Make sure you have enough of disk space on the filesystem where is STOR2RRD installed
Roughly you might count 2 - 30 GB per a storage (it depends on number of volumes, 30GB for 5000 volumes)$ df -g /home # AIX $ df -h /home # Linux
-
Test storage connectivity, either from the UI or from the command line:
When connection failed and direct command says this:
$ cd /home/stor2rrd/stor2rrd
$ ./bin/config_check.sh
  =========================
  STORAGE: MD3800_01: DS5K
  =========================
  /usr/SMclient/SMcli -n MD3800_01 -e -c "storageSubsystem summary;"
  connection ok
Then it looks like that the latest firmwares require enabling of password authorization.$ SMcli -n MD3800_01 -e -c "show hostTopology;" Warning! No Monitor password is set for the storage subsystem.
Set password for monitor account in the storage UI and then place same password into etc/storage-list.cfg
Do not use shell special characters like #!?|$*[]\{}`"'& in the password, use ;:.+-%@ instead.Then verify connection via:MD3800_01:DS5K:monitor:password01:
$ ./bin/config_check.sh MD3800_01
...
- Schedule to run storage agent from stor2rrd crontab (lpar2rrd on Virtual Appliance, it might already exist there)
Add if it does not exist as above
$ crontab -l | grep load_ds5perf.sh
$
Assure there is already an entry with the UI creation running once an hour in crontab$ crontab -e # LSI rebrands like Dell MD3000, IBM DS3000/4000/5000 and NetApp E-series 0,5,10,15,20,25,30,35,40,45,50,55 * * * * /home/stor2rrd/stor2rrd/load_ds5perf.sh > /home/stor2rrd/stor2rrd/load_ds5perf.out 2>&1
$ crontab -e

# STOR2RRD UI (just ONE entry of load.sh must be there)
5 * * * * /home/stor2rrd/stor2rrd/load.sh > /home/stor2rrd/stor2rrd/load.out 2>&1
-
Let run the storage agent for 15 - 20 minutes to get data, then:
$ cd /home/stor2rrd/stor2rrd
$ ./load.sh
- Go to the web UI: http://<your web server>/stor2rrd/
Use Ctrl-F5 to refresh the web browser cache.
In case of usage of Virtual Appliance- Use local account lpar2rrd for hosting of STOR2RRD on the virtual appliance
- Use /home/stor2rrd/stor2rrd as the product home
Storage connectivity
-
Allow access from the STOR2RRD host to EqualLogic storage on port 161 (UDP)
$ perl /home/stor2rrd/stor2rrd/bin/conntest_udp.pl 192.168.1.1 161
  Connection to "192.168.1.1" on port "161" is ok
SNMP suport on STOR2RRD server
-
Make sure you have installed SNMP support on STOR2RRD hosts, skip that in case you are on our Virtual Appliance
- AIX
# rpm -Uvh net-snmp net-snmp-utils net-snmp-perl
- Linux
Follow this to get installed SNMP support in the tool on RHEL8 and CentOS8.
Note you might need to allow optional repositories on RHEL to yum can find it# umask 0022 # yum install net-snmp # yum install net-snmp-utils # yum install net-snmp-perl
Use rhel-7-for-power-le-optional-rpms for Linux on Power etc ...# subscription-manager repos --list ... # subscription-manager repos --enable rhel-7-server-optional-rpms
- Linux Debian/Ubuntu
Assure that this line is commented out in /etc/snmp/snmp.conf% umask 0022 % apt-get install snmp libsnmp-perl snmp-mibs-downloader
#mibs :
If apt-get does not find snmp-mibs-downloader package then enable contrib and non-free repositories.
Perl modules must be installed: net-snmp, net-snmp-utils, net-snmp-perl
Storage setup
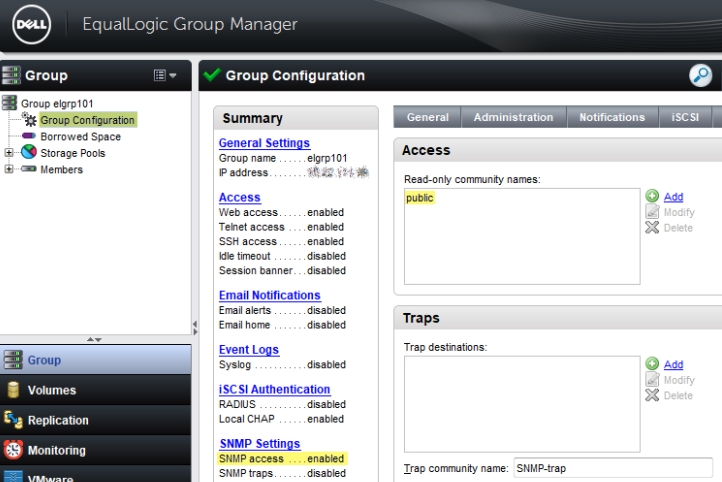
- Go to Equallogic group SNMP configuration
- Add new Read-only community if necessary
- Make a note of the group name for device configuration in STOR2RRD.
- Make sure SNMP access is enabled.
STOR2RRD storage configuration
- All actions below under stor2rrd user (lpar2rrd on Virtual Appliance)
-
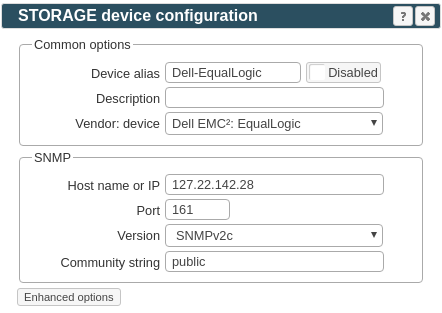
Add storage into configuration from the UI:
Settings icon ➡ Storage ➡ New ➡ Vendor:device ➡ Dell EMC:EqualLogic
- Schedule to run storage agent from stor2rrd crontab (lpar2rrd on Virtual Appliance, it might already exist there)
Add if it does not exist as above
$ crontab -l | grep load_equallogicperf.sh
$
Assure there is already an entry with the UI creation running once an hour in crontab$ crontab -e # Dell EqualLogic 0,5,10,15,20,25,30,35,40,45,50,55 * * * * /home/stor2rrd/stor2rrd/load_equallogicperf.sh > /home/stor2rrd/stor2rrd/load_equallogicperf.out 2>&1
$ crontab -e

# STOR2RRD UI (just ONE entry of load.sh must be there)
5 * * * * /home/stor2rrd/stor2rrd/load.sh > /home/stor2rrd/stor2rrd/load.out 2>&1
-
Let run the storage agent for 15 - 20 minutes to get data, then:
$ cd /home/stor2rrd/stor2rrd
$ ./load.sh
- Go to the web UI: http://<your web server>/stor2rrd/
Use Ctrl-F5 to refresh the web browser cache.
- Allow access from the STOR2RRD host to the storage on both controllers on port 2463.