NetApp monitoring: FAS, AFF, E/EF-series, SolidFire, StorageGRID, ONTAP Select
In case of usage of Virtual Appliance
Note NetApp ONTAPI is not available since NetApp ONTAP 9.13.1, REST API must be used instead
- Use local account lpar2rrd for hosting of STOR2RRD on the virtual appliance
- Use /home/stor2rrd/stor2rrd as the product home
Note NetApp ONTAPI is not available since NetApp ONTAP 9.13.1, REST API must be used instead
- Read this in case of NetApp ONTAP v9 support. There is a bug in ONTAP v9
-
Allow access from the STOR2RRD host to the NetApp storage on port 22 (ssh) and 80 (443 if you use SSL).
Test if ports are open:$ perl /home/stor2rrd/stor2rrd/bin/conntest.pl 192.168.1.1 22 Connection to "192.168.1.1" on port "22" is ok $ perl /home/stor2rrd/stor2rrd/bin/conntest.pl 192.168.1.1 80 Connection to "192.168.1.1" on port "80" is ok
- Create ssh-keys on STOR2RRD host under stor2rrd user if do not exist yet.
It should already exist on the Virtual Appliance, skip it there.
Type enter instead of passphrase# su - stor2rrd # (use lpar2rrd user on the Appliance) $ ls -l ~/.ssh/id_rsa.pub $ ssh-keygen -t rsa -N "" Generating public/private rsa key pair. Enter file in which to save the key (/home/stor2rrd/.ssh/id_rsa): ... $ ls -l ~/.ssh/id_rsa.pub -rw-r--r-- 1 stor2rrd stor2rrd 382 Jun 1 12:47 /home/stor2rrd/.ssh/id_rsa.pub
New storage devices might require stronger key, use this one instead of above 'RSA'$ ssh-keygen -t ecdsa -b 521 -N ""
-
Login to C-mode NetApp system as admin and create user for performance monitoring:
Cmode::> security login role create -role monitor -cmddirname DEFAULT -access readonly
Cmode::> security login role create -role monitor -cmddirname set -access all
Cmode::> security login role create -role monitor -cmddirname statistics -access all

# You can check the role you've just created
Cmode::> security login role show -role monitor

             Role          Command/                                      Access
  Vserver    Name          Directory                               Query Level
  ---------- ------------- --------- ----------------------------------- --------
  xorux      monitor       DEFAULT                                       readonly
  xorux      monitor       set                                           all
  xorux      monitor       statistics                                    all
  3 entries were displayed.

# Create stor2rrd user, enable SSH, ONTAPI
Cmode::> security login create -username stor2rrd -role monitor -application ssh -authmethod password
Cmode::> security login create -username stor2rrd -role monitor -application ontapi -authmethod password
Cmode::> security login create -username stor2rrd -role monitor -application ssh -authmethod publickey

# Assign stor2rrd user for monitoring role
Cmode::> security login modify stor2rrd -role monitor *
Cmode::> security login show Authentication Acct Is-Nsswitch User/Group Name Application Method Role Name Locked Group ---------------- ----------- --------- ---------------- ------ ----------- stor2rrd ontapi password monitor no no stor2rrd ssh password monitor no no stor2rrd ssh publickey monitor - no -
Enable ssh key authentication.
On the STOR2RRD server show the public key (id_rsa.pub or id_rsa.pub), under stor2rrd (lpar2rrd user on the Appliance)Note: If your storage is in FIPS mode then you must use more secure ssh kyes, DSA/RSA keys will not work$ cat ~/.ssh/id_rsa.pub ssh-rsa AAAAB3NzaC1yc2EAAAADAQABAAABAQCu7y41DTAqJwqA4KJfZQWiqU7IMbs8lbK0nvDgZ9dMWmd3l+uawDKxkUdvnRUxBrLqGrxHZx3CjcLoNDqvlFl0AKE3DRTmv6o7plD3b1jRwsCABpNob5knZ/A3E4uVWytJPz036zjkn4vUSrGKJon3oUgLkmtSJoT2FCLvmPbYONPEqs+tQ/yCCkIpVcZwCxwPCbC7nnuuXhjMmRQNzNooREgBHr4eUWr3rlUPNxsSBjg6Mcbfb3u3O9+e49KJKUvMoD40AULW3h3j6bJ6bTTyhKavETpnkryeEq3936oVJdKdd4noraR54rK8lLrErFYgAG8ugLrxzmOYt6dN1phb
Generate it by (type enter when you are prompted):use this pub key: cat ~/.ssh/id_ecdsa.pub$ ssh-keygen -t ecdsa -b 521
Place the key into this command on NetApp (still under admin user)Assure ssh-key access works, it should not prompt for passwordCmode::> security login publickey create -username stor2rrd -publickey "ssh-rsa AAAAB3NzaC1yc2EAAAADAQABAAABAQCu7y41DTAqJwqA4KJfZQWiqU7IMbs8lbK0nvDgZ9dMWmd3l+uawDKxkUdvnRUxBrLqGrxHZx3CjcLoNDqvlFl0AKE3DRTmv6o7plD3b1jRwsCABpNob5knZ/A3E4uVWytJPz036zjkn4vUSrGKJon3oUgLkmtSJoT2FCLvmPbYONPEqs+tQ/yCCkIpVcZwCxwPCbC7nnuuXhjMmRQNzNooREgBHr4eUWr3rlUPNxsSBjg6Mcbfb3u3O9+e49KJKUvMoD40AULW3h3j6bJ6bTTyhKavETpnkryeEq3936oVJdKdd4noraR54rK8lLrErFYgAG8ugLrxzmOYt6dN1phb" -comment STOR2RRD
Log out from NetApp and try to log in as stor2rrd user$ ssh stor2rrd@192.168.1.1 Cmode::>
- Assure that web services are started, again under admin account
Cmode::> system services web show External Web Services: true Status: online HTTP Protocol Port: 80 HTTPS Protocol Port: 443 HTTP Enabled: true - Assure that NetApp build in firewall does not filter it:
Cmode::> firewall policy show -policy mgmt -instance -service http,https
  Vserver Name: Cmode
      Policy: mgmt
     Service: http
  Allowed IPs: 0.0.0.0/0
     IPspace: Default

  Vserver Name: Cmode
      Policy: mgmt
     Service: https
  Allowed IPs: 0.0.0.0/0
     IPspace: Default

Cmode::> net int show -vserver Cmode -lif cluster_mgmt
  --> interfaces must have: Firewall Policy: mgmt
STOR2RRD storage configuration
- All actions below under stor2rrd user (lpar2rrd on Virtual Appliance)
-
Add storage into configuration from the UI:
Settings icon ➡ Storage ➡ New ➡ Vendor:device ➡ NetApp FAS CDOT / AFF A-series

-
If you get errors such as "Missing LWP::Protocol::https", "Connection reset by peer" or "500 SSL negotiation failed" then follow this.
-
Make sure you have enough of disk space on the filesystem where is STOR2RRD installed
Roughly you might count 2 - 30 GB per a storage (it depends on number of volumes, 30GB for 5000 volumes)$ df -g /home # AIX $ df -h /home # Linux
-
Test storage connectivity, either from the UI or from the command line:
$ cd /home/stor2rrd/stor2rrd
$ ./bin/config_check.sh
  =====================================
  STORAGE: cmode-storage-alias : NetApp
  =====================================
  connection ok
- Schedule to run storage agent from stor2rrd crontab (lpar2rrd on Virtual Appliance, it might already exist there)
Add if it does not exist as above
$ crontab -l | grep load_netappperf.sh
$
Assure there is already an entry with the UI creation running once an hour in crontab$ crontab -e # NetApp FAS : C-mode & 7-mode (same code, use it just once) 0,5,10,15,20,25,30,35,40,45,50,55 * * * * /home/stor2rrd/stor2rrd/load_netappperf.sh > /home/stor2rrd/stor2rrd/load_netappperf.out 2>&1
$ crontab -e

# STOR2RRD UI (just ONE entry of load.sh must be there)
5 * * * * /home/stor2rrd/stor2rrd/load.sh > /home/stor2rrd/stor2rrd/load.out 2>&1
-
Let run the storage agent for 15 - 20 minutes to get data, then:
$ cd /home/stor2rrd/stor2rrd
$ ./load.sh
- Go to the web UI: http://<your web server>/stor2rrd/
Use Ctrl-F5 to refresh the web browser cache.
In case of usage of Virtual Appliance
Netapp's SANtricity Web Service Proxy is also supported as the REST API data source, use 08.40.60.01+ firmware.
- Use local account lpar2rrd for hosting of STOR2RRD on the virtual appliance
- Use /home/stor2rrd/stor2rrd as the product home
- REST API use it on new models which support it, it provides more data metrics and is not necessary install 3rd part SW
- SANtricity CLI works on all models
Netapp's SANtricity Web Service Proxy is also supported as the REST API data source, use 08.40.60.01+ firmware.
NetApp REST API
-
Allow access from the STOR2RRD host to the NetApp storage on port 8443.
Test if port is open:$ perl /home/stor2rrd/stor2rrd/bin/conntest.pl 192.168.1.1 8443 Connection to "192.168.1.1" on port "8443" is ok
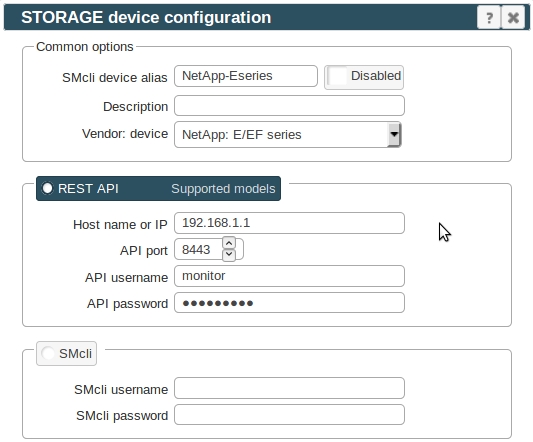
- Storage user: use predefined user monitor which has monitor role. Change its password if necessary through the storage UI.
- Add storage into configuration from the UI:
Settings icon ➡ Storage ➡ New ➡ Vendor:device ➡ NetApp E/EF-series ➡ REST API
- All actions below under stor2rrd user on STOR2RRD server (lpar2rrd on Virtual Appliance)
-
Assure you have enough of disk space on the filesystem where is STOR2RRD installed
Roughly you might count 2 - 30 GB per a storage (it depends on number of volumes, 30GB for 5000 volumes)$ df -g /home # AIX $ df -h /home # Linux
- Schedule to run storage agent from stor2rrd crontab (lpar2rrd on Virtual Appliance, it might already exist there)
Add if it does not exist as above
$ crontab -l | grep load_ds5perf.sh
$
Assure there is already an entry with the UI creation running once an hour in crontab$ crontab -e # NetApp E-series (use same script load_ds5perf.sh as IBM DS3000/DS4000/DS5000) 0,5,10,15,20,25,30,35,40,45,50,55 * * * * /home/stor2rrd/stor2rrd/load_ds5perf.sh > /home/stor2rrd/stor2rrd/load_ds5perf.out 2>&1
$ crontab -e

# STOR2RRD UI (just ONE entry of load.sh must be there)
5 * * * * /home/stor2rrd/stor2rrd/load.sh > /home/stor2rrd/stor2rrd/load.out 2>&1
-
Let run the storage agent for 15 - 20 minutes to get data, then:
$ cd /home/stor2rrd/stor2rrd
$ ./load.sh
- Go to the web UI: http://<your web server>/stor2rrd/
Use Ctrl-F5 to refresh the web browser cache.
NetApp SANtricity CLI
SMcli installation-
Download and install SMcli package from NetApp download site.
Go to support.netapp.com ➡ downloads ➡ software ➡ (login) ➡
E-Series SANtricity Storage Manager (all platforms - Go) ➡
View & download ➡ Continue (on end of the page) ➡ Accept (on end of the page) ➡
Download SMIA-<OS platform>-11.10.nnnn.nnnn.bin
-
AIX prerequisites:
Install X11 packages from your AIX install media:- X11.adt
- X11.base
- X11.motif
# lslpp -L |egrep "X11.adt|X11.base|X11.motif"
  X11.adt.bitmaps            6.1.0.0    C     F    AIXwindows Application
  X11.adt.ext                6.1.6.0    C     F    AIXwindows Application
  X11.adt.imake              6.1.6.0    C     F    AIXwindows Application
  X11.adt.include            6.1.4.0    C     F    AIXwindows Application
  X11.adt.lib                6.1.2.0    C     F    AIXwindows Application
  X11.adt.motif              6.1.6.0    C     F    AIXwindows Application
  X11.base.common            6.1.0.0    C     F    AIXwindows Runtime Common
  X11.base.lib               6.1.6.0    C     F    AIXwindows Runtime Libraries
  X11.base.rte               6.1.6.0    C     F    AIXwindows Runtime Environment
  X11.base.smt               6.1.6.0    C     F    AIXwindows Runtime Shared
  X11.base.xpconfig          6.1.0.0    C     F    Xprint Configuration Files
  X11.motif.lib              6.1.6.0    C     F    AIXwindows Motif Libraries
  X11.motif.mwm              6.1.6.0    C     F    AIXwindows Motif Window
-
If there is already installed SMcli from IBM to monitor DS3000/4000/5000 storage then it must be removed:
# /opt/IBM_DS/Uninstall\ IBM\ System\ Storage\ DS\ Storage\ Manager\ 10/Uninstall\ IBM\ System\ Storage\ DS\ Storage\ Manager\ 10
-
Install SMcli under root user (Installation manual):
In case of any problem check Install logs in /opt/StorageManager/InstallLogs/ or /opt/InstallLogs
# umask 022
# chmod 775 SMIA-LINUXX64-11.30.0A00.0010.bin
# ./SMIA-LINUXX64-11.30.0A00.0010.bin  -i console

  Please choose the Install Set to be installed by this installer.
    1- Typical (Full Installation)
--> 2- Management Station
    3- Host
    4- Customize...

  ENTER THE NUMBER FOR THE INSTALL SET, OR PRESS <ENTER> TO ACCEPT THE DEFAULT
  : 2
  ......

  Installation Complete
  ---------------------
  Congratulations. SANtricity has been successfully installed to:

  /opt/StorageManager

# ls -lL /usr/bin/SMcli
  -rwxr-xr-x 1 root root 1108 Oct 14 21:44 /usr/bin/SMcli
-
Stop SMmonitor service
AIX:Linux:# SMmonitor stop # rmitab smmonitor
Linux systemd:# /opt/SMgr/client/SMmonitor stop # chkconfig --list SMmonitor # chkconfig --level 2345 SMmonitor off alternatively: # rm -f /etc/rc2.d/S99SMmonitor /etc/rc.d/init.d/SMmonitor
# systemctl stop smmonitor.service
# systemctl disable smmonitor.service
- Allow user stor2rrd run SMcli API (lpar2rrd user on Virtual Appliance)
Under root execute following:If you do not do it then you get such error by running it under someone else than root:# rm -f /var/opt/SM/emwdata_v04_bin.lock /var/opt/SM/pref_01_bin.lock /var/opt/SM/PMServer.lock # chown stor2rrd /opt/SMgr/client/SMcli /var/opt/SM/prefbackup_01.bin # chown stor2rrd /var/opt/SM/emwback_v04.bin /var/opt/SM /var/opt/SM/emwdata_v04.bin # chown stor2rrd /var/opt/SM /var/opt/SM/pref_01.bin # chmod -f 644 /usr/SMgr/jre/lib/security/java.security /usr/SMruntime/jre/lib/security/java.security # chmod -f 755 /opt/SMgr/client/lib/*
(Do not forget to deactivate SMmonitor as above as it can change file rights back to root itself)# su - stor2rrd # (lpar2rrd user on the Virtual Appliance) $ SMcli -d An internal error, error code 12, has occurred. This is possibly due to initialization problems when loading the necessary internal files. Please check your installation of the storage management client. If problems continue to persist, re-install the storage management client.
-
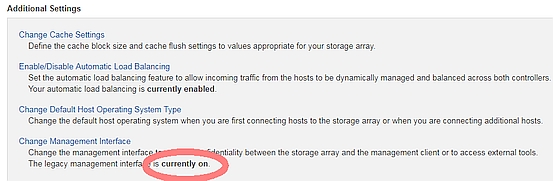
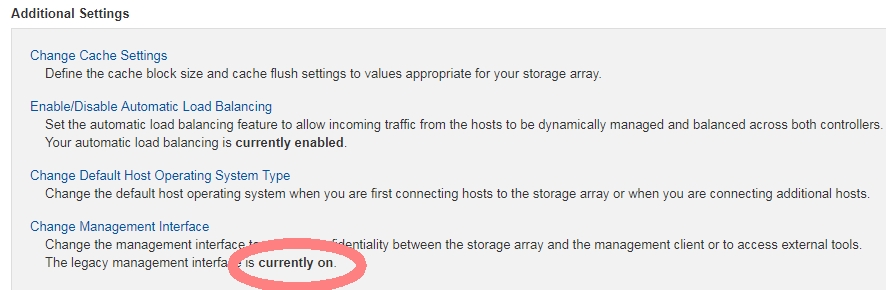
Allow "The legacy management interface" via SANtricity (it is necessary only on some firmare releases)
Storage configuration
-
Allow access from the STOR2RRD host to the NetApp storage on both controllers on port 2463.
Test if port is open:$ perl /home/stor2rrd/stor2rrd/bin/conntest.pl 192.168.1.1 2463 Connection to "192.168.1.1" on port "2463" is ok
- Connect new storage, you must connect both storage controllers
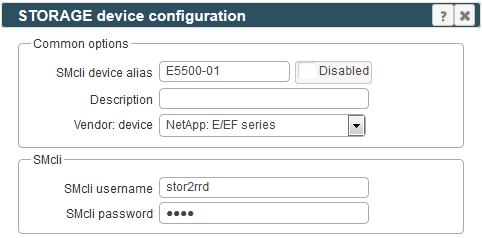
Use "E5500-01" further for etc/storage-list.cfg configuration
# su - stor2rrd  # (lpar2rrd user on the Virtual Appliance)
$ SMcli -d
  There are currently no storage subsystems listed in the configuration file. Add
  storage subsystems using the Add Storage Subsystem option in the storage management
  software or by command line.
$ SMcli -A 192.168.1.1 192.168.1.2
  New storage subsystem was discovered at address 192.168.1.1
  New storage subsystem was discovered at address 192.168.1.2
  SMcli completed successfully
$ SMcli -d
  E5500-01  ControlerA_hostname  ControlerB_hostname
-
Check if the storage needs user authorization (new firmwares allows to specify password for monitor user role):
When it fails then use "monitor" role credetials (password can be set in the storage UI):
$ SMcli -n E5500-01 -e -c "show hostTopology;"
Use that credentials in future etc/storage-list.cfg configuration$ SMcli -n E5500-01 -e -c "show hostTopology;" The operation needs either the 'Administrator' or 'Monitor' password to be set. $ SMcli -n E5500-01 -p <password> -R monitor -e -c "show hostTopology;"
STOR2RRD storage configuration
- All actions below under stor2rrd user (lpar2rrd on Virtual Appliance)
-
Add storage into configuration from the UI:
Settings icon ➡ Storage ➡ New ➡ Vendor:device ➡ NetApp E/EF-series
-
Make sure you have enough of disk space on the filesystem where is STOR2RRD installed
Roughly you might count 2 - 30 GB per a storage (it depends on number of volumes, 30GB for 5000 volumes)$ df -g /home # AIX $ df -h /home # Linux
-
Test storage connectivity, either from the UI or from the command line:
When connection failed and direct command says this:
$ cd /home/stor2rrd/stor2rrd
$ ./bin/config_check.sh E5500-01
  =======================
  STORAGE: E5500-01: DS5K
  =======================
  /usr/SMclient/SMcli -n E5500-01 -e -c "storageSubsystem summary;"
  connection ok
Then it looks like that the latest firmwares require enabling of password authorization.$ SMcli -n E5500_01 -e -c "show hostTopology;" Warning! No Monitor password is set for the storage subsystem.
Set password for monitor account in the storage UI and then place same password into etc/storage-list.cfg
Do not use shell special characters like #!?|$*[]\{}`"'& in the password, use ;:.+-%@ instead.Then verify connection via:E5500_01:DS5K:monitor:password01:
$ ./bin/config_check.sh E5500_01
...
- Schedule to run storage agent from stor2rrd crontab (lpar2rrd on Virtual Appliance, it might already exist there)
Add if it does not exist as above
$ crontab -l | grep load_ds5perf.sh
$
Assure there is already an entry with the UI creation running once an hour in crontab$ crontab -e # NetApp E-series (use same script load_ds5perf.sh as IBM DS3000/DS4000/DS5000) 0,5,10,15,20,25,30,35,40,45,50,55 * * * * /home/stor2rrd/stor2rrd/load_ds5perf.sh > /home/stor2rrd/stor2rrd/load_ds5perf.out 2>&1
$ crontab -e

# STOR2RRD UI (just ONE entry of load.sh must be there)
5 * * * * /home/stor2rrd/stor2rrd/load.sh > /home/stor2rrd/stor2rrd/load.out 2>&1
-
Let run the storage agent for 15 - 20 minutes to get data, then:
$ cd /home/stor2rrd/stor2rrd
$ ./load.sh
- Go to the web UI: http://<your web server>/stor2rrd/
Use Ctrl-F5 to refresh the web browser cache.
In case of usage of Virtual Appliance
One of main advantages of our solution is not requring storage admin rights for getting data from the storage!
- Use local account lpar2rrd for hosting of STOR2RRD on the virtual appliance
- Use /home/stor2rrd/stor2rrd as the product home
One of main advantages of our solution is not requring storage admin rights for getting data from the storage!
-
Allow access from the STOR2RRD host to the NetApp storage on port 22 (ssh) and 80 (443 if you use SSL).
Test if ports are open:$ perl /home/stor2rrd/stor2rrd/bin/conntest.pl 192.168.1.1 22 Connection to "192.168.1.1" on port "22" is ok $ perl /home/stor2rrd/stor2rrd/bin/conntest.pl 192.168.1.1 80 Connection to "192.168.1.1" on port "80" is ok
- Create ssh-keys on STOR2RRD host under stor2rrd user if do not exist yet.
It should already exist on the Virtual Appliance, skip it there.
Type enter instead of passphrase# su - stor2rrd # (use lpar2rrd user on the Appliance) $ ls -l ~/.ssh/id_rsa.pub $ ssh-keygen -t rsa -N "" Generating public/private rsa key pair. Enter file in which to save the key (/home/stor2rrd/.ssh/id_rsa): ... $ ls -l ~/.ssh/id_rsa.pub -rw-r--r-- 1 stor2rrd stor2rrd 382 Jun 1 12:47 /home/stor2rrd/.ssh/id_rsa.pub
New storage devices might require stronger key, use this one instead of above 'RSA'$ ssh-keygen -t ecdsa -b 521 -N ""
-
Login to 7-mode NetApp system as admin and prepare the role for performance monitoring:
Old 7mode firmwares do not support api-diagnosis-status-get in "useradmin role add monitor" cmd and fails with:
# perf monitoring role - login via ssh / http API, stats, some API commands (aggr-list-info, volume-list-info...)
7mode> useradmin role add monitor -a cli-stats,cli-man,cli-?,cli-rdfile,cli-sysconfig,login-ssh,login-http-admin,api-aggr-list-info,api-volume-list-info,api-disk-list-info,api-lun-list-info,api-diagnosis-status-get,api-perf-*

# group with role
7mode> useradmin group add Monitor -r monitor

# user in group
7mode> useradmin user add stor2rrd -g Monitor

# check if SSH is enabled, public keys can be used and your guest has ssh access:
# If these values are set in a different way, a secureadmin setup should be done
# If ssh.access contains list of host then add your STOR2RRD host there
7mode> options ssh
  ssh.access                   *
  ssh.enable                   on
  ssh.pubkey_auth.enable       on
  ssh2.enable                  on

# check trusted hosts list, there should be * by default or add to the list STOR2RRD host
7mode> options trusted
  options trusted.hosts        *

# In OnTap 8 and later, you must explicitly enable HTTP access for the API:
7mode> options httpd.admin.enable on
Use this cmd instead (STOR2RRD storage status in healthcheck will not work then)Invalid capabilities: api-diagnosis-status-get Could not modify role <monitor>. Error: Invalid capability
7mode> useradmin role add monitor -a cli-stats,cli-man,cli-?,cli-rdfile,cli-sysconfig,login-ssh,login-http-admin,api-aggr-list-info,api-volume-list-info,api-disk-list-info,api-lun-list-info,api-perf-*
-
Enable ssh key authentication.
At first check what is your "trusted host", they are listed in vol0 line after string "root=". example below shows that it is 192.168.1.53You have to log on as root to one of storage configured trusted hosts, mount storage's root filesystem and append the ssh key there.7mode> exportfs /vol/vol0 -sec=sys,rw,root=192.168.1.53,nosuid ...
NetApp descriptionAssure ssh-key access works, it should not promt for password# mount netapp-7mode:/ /mnt # cat /home/stor2rrd/.ssh/id_rsa.pub >> /mnt/etc/sshd/stor2rrd/.ssh/authorized_keys2 # umount /mnt
Try that under stor2rrd user from stor2rrd server:# su - stor2rrd (lpar2rrd on the Virtual Appliance) $ ssh stor2rrd@192.168.1.1 7mode>
STOR2RRD storage configuration
- All actions below under stor2rrd user (lpar2rrd on Virtual Appliance)
-
Add storage into configuration from the UI:
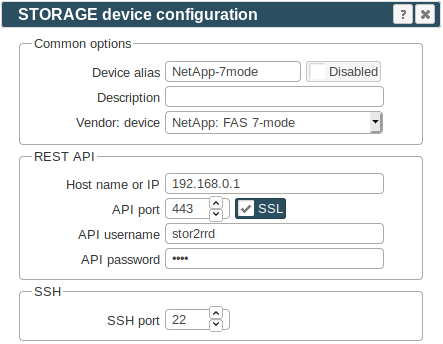
Settings icon ➡ Storage ➡ New ➡ Vendor:device ➡ NetApp FAS 7mode
-
HTTPS usage:
If you get an errors like "Missing LWP::Protocol::https", "Connection reset by peer" or "500 SSL negotiation failed" then follow this.$ vi /home/stor2rrd/stor2rrd/etc/storage-list.cfg 7mode-storage-alias:NETAPP:7MODE:192.168.1.1:22:443:1:stor2rrd:KT4mXVI9N0BUPjZdVQo=
-
Make sure you have enough of disk space on the filesystem where is STOR2RRD installed
Roughly you might count 2 - 30 GB per a storage (it depends on number of volumes, 30GB for 5000 volumes)$ df -g /home # AIX $ df -h /home # Linux
-
Test storage connectivity, either from the UI or from the command line:
If you get error "no matching cipher found. Their offer: 3des-cbc", follow this to fix it.
$ cd /home/stor2rrd/stor2rrd
$ ./bin/config_check.sh
  =====================================
  STORAGE: 7mode-storage-alias : NetApp
  =====================================
  connection ok
- Schedule to run storage agent from stor2rrd crontab (lpar2rrd on Virtual Appliance, it might already exist there)
Add if it does not exist as above
$ crontab -l | grep load_netappperf.sh
$
Assure there is already an entry with the UI creation running once an hour in crontab$ crontab -e # NetApp FAS : C-mode & 7-mode (same code, use it just once) 0,5,10,15,20,25,30,35,40,45,50,55 * * * * /home/stor2rrd/stor2rrd/load_netappperf.sh > /home/stor2rrd/stor2rrd/load_netappperf.out 2>&1
$ crontab -e

# STOR2RRD UI (just ONE entry of load.sh must be there)
5 * * * * /home/stor2rrd/stor2rrd/load.sh > /home/stor2rrd/stor2rrd/load.out 2>&1
-
Let run the storage agent for 15 - 20 minutes to get data, then:
$ cd /home/stor2rrd/stor2rrd
$ ./load.sh
- Go to the web UI: http://<your web server>/stor2rrd/
Use Ctrl-F5 to refresh the web browser cache.
In case of usage of Virtual Appliance
- Use local account lpar2rrd for hosting of STOR2RRD on the virtual appliance
- Use /home/stor2rrd/stor2rrd as the product home
Storage connectivity
-
Allow access from the STOR2RRD host to the NetApp storage on port 443
$ perl /home/stor2rrd/stor2rrd/bin/conntest.pl 192.168.1.1 443
  Connection to "192.168.1.1" on port "443" is ok
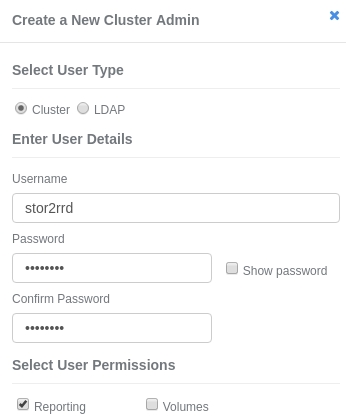
- Storage user: create user stor2rrd user in Reporting role
STOR2RRD storage configuration
-
Add storage into configuration from the UI:
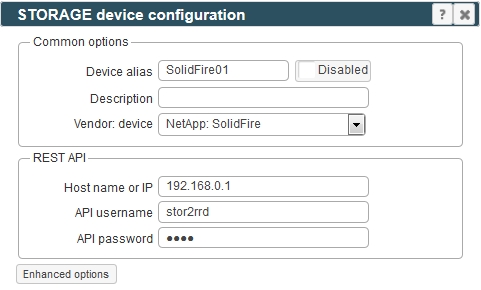
Settings icon ➡ Storage ➡ New ➡ Vendor:device ➡ NetApp : SolidFire
-
Assure you have enough of disk space on the filesystem where is STOR2RRD installed
Roughly you might count 2 - 30 GB per a storage (it depends on number of volumes, 30GB for 5000 volumes)$ df -g /home # AIX $ df -h /home # Linux
- Schedule to run storage agent from stor2rrd crontab (lpar2rrd on Virtual Appliance, it might already exist there)
Add if it does not exist as above
$ crontab -l | grep load_solidfireperf.sh
$
Assure there is already an entry with the UI creation running once an hour in crontab$ crontab -e # NetApp SolidFire 0,5,10,15,20,25,30,35,40,45,50,55 * * * * /home/stor2rrd/stor2rrd/load_solidfireperf.sh > /home/stor2rrd/stor2rrd/load_solidfireperf.out 2>&1
$ crontab -e

# STOR2RRD UI (just ONE entry of load.sh must be there)
5 * * * * /home/stor2rrd/stor2rrd/load.sh > /home/stor2rrd/stor2rrd/load.out 2>&1
-
Let run the storage agent for 15 - 20 minutes to get data, then:
$ cd /home/stor2rrd/stor2rrd
$ ./load.sh
- Go to the web UI: http://<your web server>/stor2rrd/
Use Ctrl-F5 to refresh the web browser cache.
In case of usage of Virtual Appliance
- Use local account lpar2rrd for hosting of STOR2RRD on the virtual appliance
- Use /home/stor2rrd/stor2rrd as the product home
Storage connectivity
-
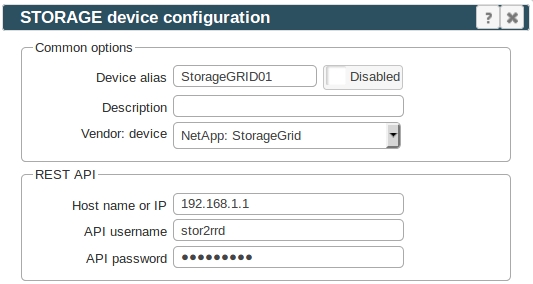
STOR2RRD communicates with NetApp StorageGRID primary Admin Node IP address (same as the management Web UI IP address). Protocol: https/443
Optionally, you can specify a non-primary Admin Node IP address as well for high availability.
Allow access from the STOR2RRD host to the NetApp storage on port 443
$ perl /home/stor2rrd/stor2rrd/bin/conntest.pl 192.168.1.1 443
  Connection to "192.168.1.1" on port "443" is ok
- Storage user
-
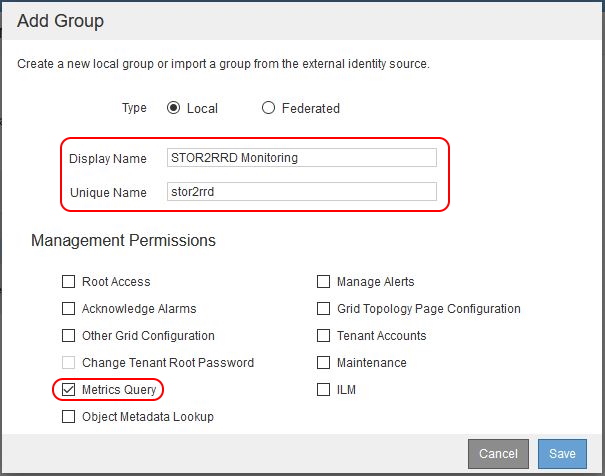
NOTE: STOR2RRD does not need a privileged access to NetApp StorageGRID.
NetApp StorageGRID "Admin User" is a type of system account used for various maintenance tasks.
The account created for STOR2RRD has access only to system metrics.
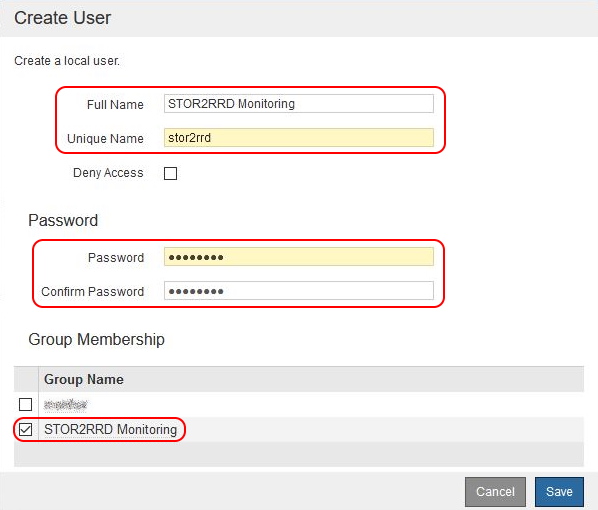
- Create new Admin Group
Configuration ➡ Admin Groups
Add new group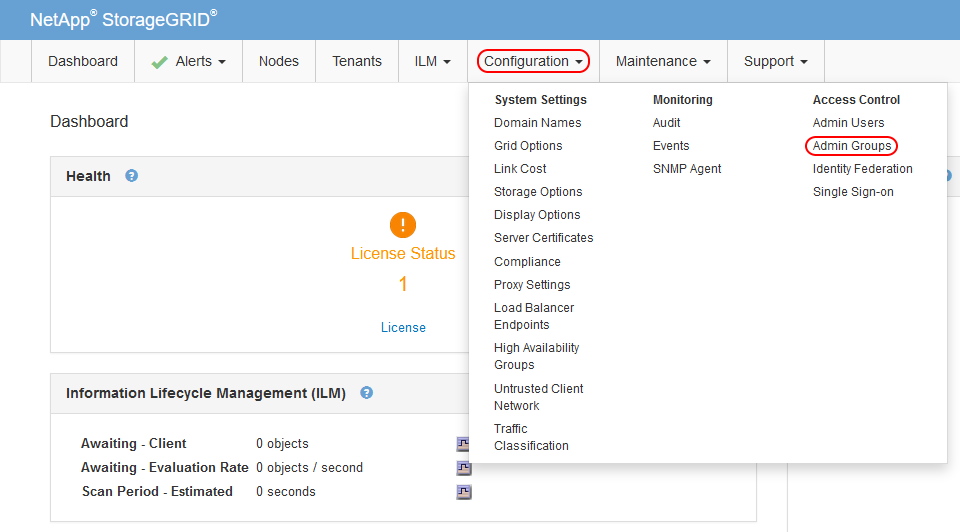
Add "Metrics Query" permission
-
Create new Admin User
Configuration ➡ Admin Users
Create new user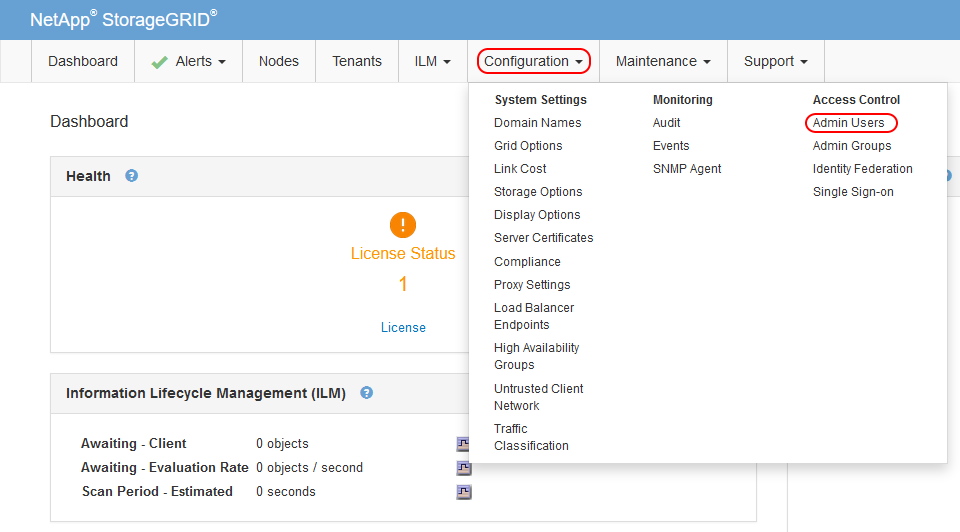
Assign previously created Admin Group to new user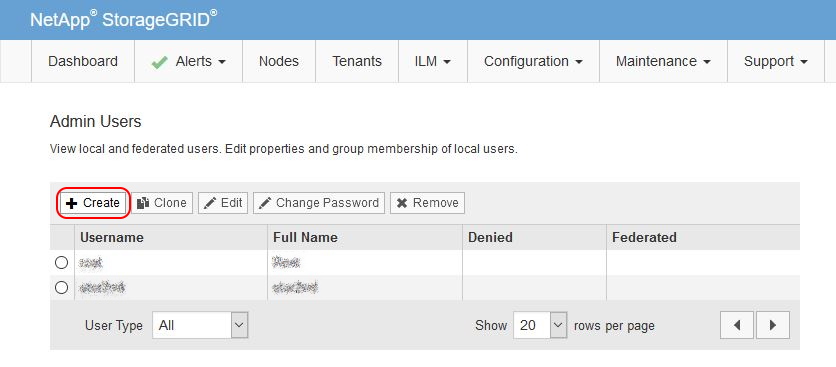
-
NOTE: STOR2RRD does not need a privileged access to NetApp StorageGRID.
STOR2RRD storage configuration
-
Add storage into configuration from the UI:
Settings icon ➡ Storage ➡ New ➡ Vendor:device ➡ NetApp : StorageGRID
-
Assure you have enough of disk space on the filesystem where is STOR2RRD installed
Roughly you might count 2 - 30 GB per a storage (it depends on number of volumes, 30GB for 5000 volumes)$ df -g /home # AIX $ df -h /home # Linux
- Schedule to run storage agent from stor2rrd crontab (lpar2rrd on Virtual Appliance, it might already exist there)
Add if it does not exist as above
$ crontab -l | grep load_storagegridperf.sh
$
Assure there is already an entry with the UI creation running once an hour in crontab$ crontab -e # NetApp StorageGRID 0,5,10,15,20,25,30,35,40,45,50,55 * * * * /home/stor2rrd/stor2rrd/load_storagegridperf.sh > /home/stor2rrd/stor2rrd/load_storagegridperf.out 2>&1
$ crontab -e

# STOR2RRD UI (just ONE entry of load.sh must be there)
5 * * * * /home/stor2rrd/stor2rrd/load.sh > /home/stor2rrd/stor2rrd/load.out 2>&1
-
Let run the storage agent for 15 - 20 minutes to get data, then:
$ cd /home/stor2rrd/stor2rrd
$ ./load.sh
- Go to the web UI: http://<your web server>/stor2rrd/
Use Ctrl-F5 to refresh the web browser cache.
In case of usage of Virtual Appliance
Note NetApp REST API is available since NetApp ONTAP 9.12.1, use ONTAPI method for older firmwares
STOR2RRD monitoring after change from ONTAPI to REST API.
- Use local account lpar2rrd for hosting of STOR2RRD on the virtual appliance
- Use /home/stor2rrd/stor2rrd as the product home
Note NetApp REST API is available since NetApp ONTAP 9.12.1, use ONTAPI method for older firmwares
STOR2RRD monitoring after change from ONTAPI to REST API.
-
Allow access from the STOR2RRD host to the NetApp storage on port 443.
Test if ports are open:$ perl /home/stor2rrd/stor2rrd/bin/conntest.pl 192.168.1.1 443 Connection to "192.168.1.1" on port "443" is ok
-
Login to C-mode NetApp system as admin and create user with read-only access for performance monitoring:
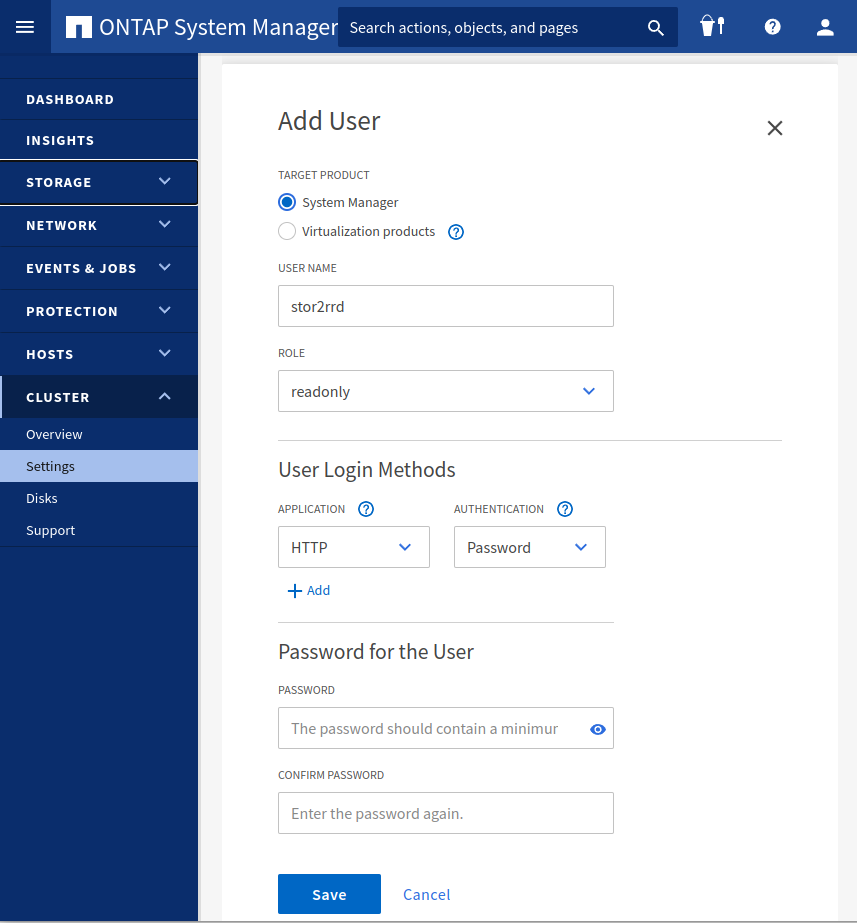
# Create stor2rrd user, enable REST API access
Cmode::> security login create -username stor2rrd -role readonly -application http -authmethod password

Cmode::> security login show -user-or-group-name stor2rrd
                                                                 Second
User/Group                 Authentication                 Acct   Authentication
Name           Application Method        Role Name        Locked Method
-------------- ----------- ------------- ---------------- ------ --------------
stor2rrd       http        password      readonly         no     none
Or you can use ONTAP System Manager to do the same:
- Make sure that web services are started, again under admin account
Cmode::> system services web show External Web Services: true Status: online HTTP Protocol Port: 80 HTTPS Protocol Port: 443 HTTP Enabled: true - Make sure that NetApp build in firewall does not filter it:
Cmode::> firewall policy show -policy mgmt -instance -service http,https
  Vserver Name: Cmode
      Policy: mgmt
     Service: http
  Allowed IPs: 0.0.0.0/0
     IPspace: Default

  Vserver Name: Cmode
      Policy: mgmt
     Service: https
  Allowed IPs: 0.0.0.0/0
     IPspace: Default

Cmode::> net int show -vserver Cmode -lif cluster_mgmt
  --> interfaces must have: Firewall Policy: mgmt
STOR2RRD storage configuration
- All actions below under stor2rrd user (lpar2rrd on Virtual Appliance)
-
Add storage into configuration from the UI:
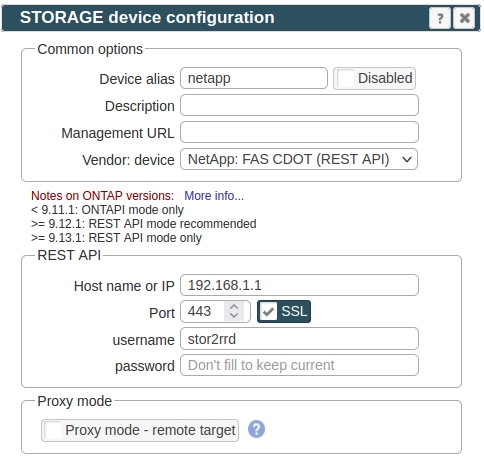
Settings icon ➡ Storage ➡ New ➡ Vendor:device ➡ NetApp FAS CDOT (REST API)
-
If you get errors such as "Missing LWP::Protocol::https", "Connection reset by peer" or "500 SSL negotiation failed" then follow this.
-
Make sure you have enough of disk space on the filesystem where is STOR2RRD installed
Roughly you might count 2 - 30 GB per a storage (it depends on number of volumes, 30GB for 5000 volumes)$ df -g /home # AIX $ df -h /home # Linux
-
Test storage connectivity, either from the UI or from the command line:
$ cd /home/stor2rrd/stor2rrd
$ ./bin/config_check.sh
  =====================================
  STORAGE: cmode-storage-alias : NetApp
  =====================================
  connection ok
- Schedule to run storage agent from stor2rrd crontab (lpar2rrd on Virtual Appliance, it might already exist there)
Add if it does not exist as above
$ crontab -l | grep load_netappperf.sh
$
Assure there is already an entry with the UI creation running once an hour in crontab$ crontab -e # NetApp FAS : C-mode, 7-mode, REST API (same code, use it just once) 0,5,10,15,20,25,30,35,40,45,50,55 * * * * /home/stor2rrd/stor2rrd/load_netappperf.sh > /home/stor2rrd/stor2rrd/load_netappperf.out 2>&1
$ crontab -e

# STOR2RRD UI (just ONE entry of load.sh must be there)
5 * * * * /home/stor2rrd/stor2rrd/load.sh > /home/stor2rrd/stor2rrd/load.out 2>&1
-
Let run the storage agent for 15 - 20 minutes to get data, then:
$ cd /home/stor2rrd/stor2rrd
$ ./load.sh
- Go to the web UI: http://<your web server>/stor2rrd/
Use Ctrl-F5 to refresh the web browser cache.